C Purlin vs Z Purlin: Key Differences, Uses, and How to Choose
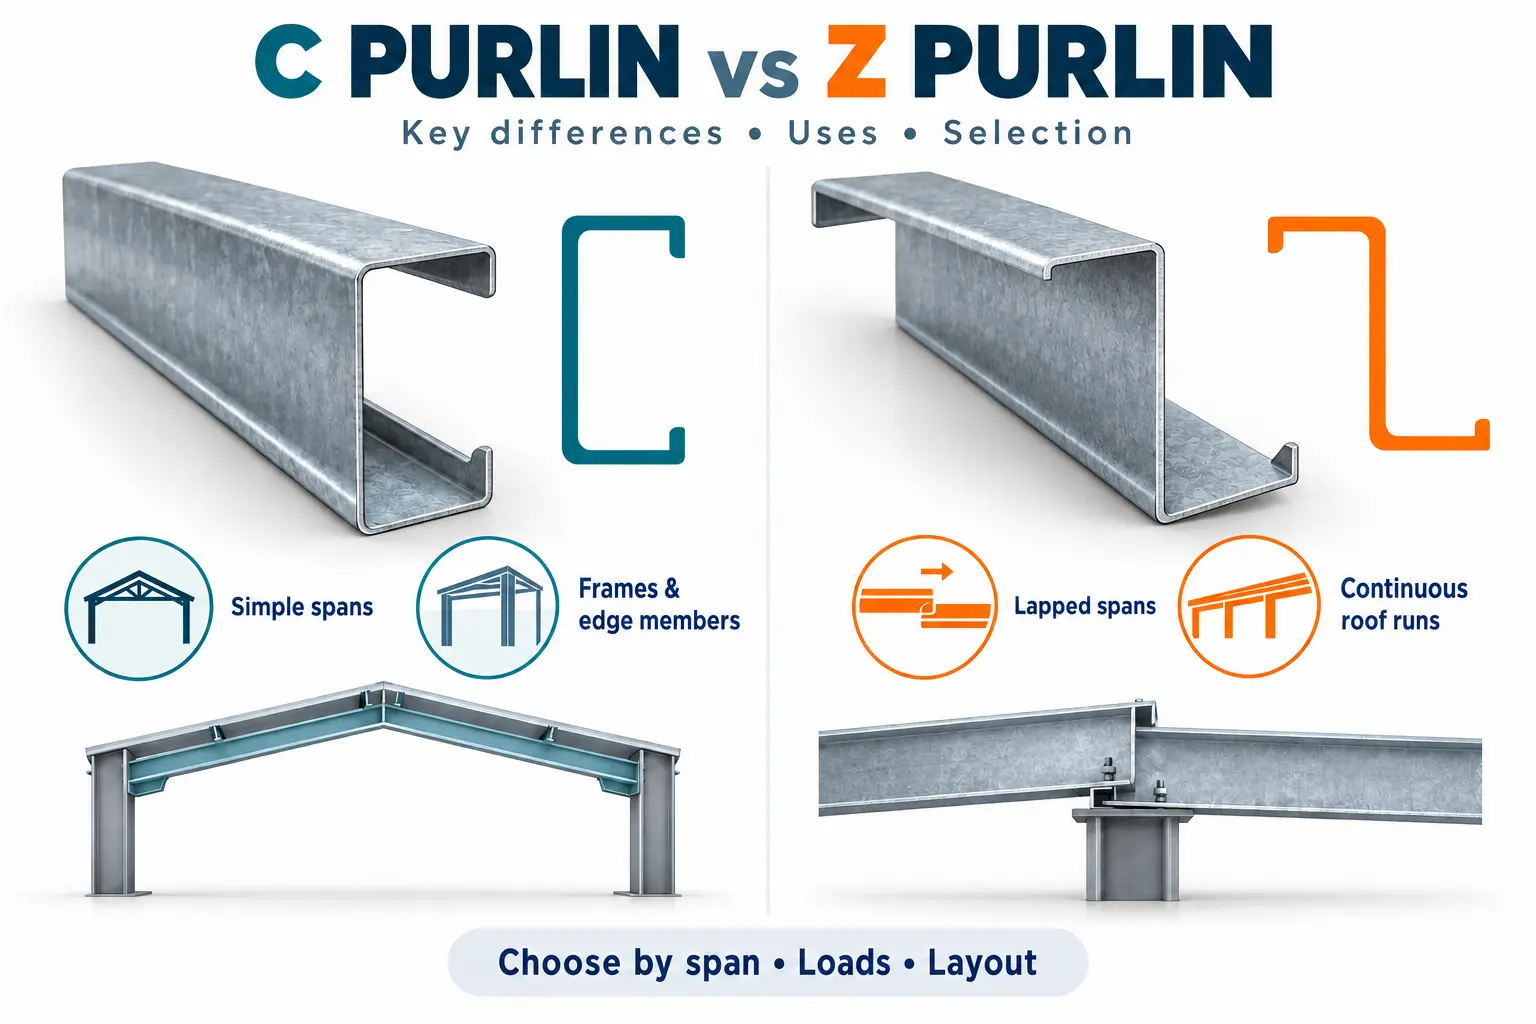
A C purlin is a channel-shaped steel member which is easy to make and suitable for shorter span and lighter roof. A Z purlin is a Z shaped product that is ideal for lapping over supports to create longer span and continuous roof structures. The one that is chosen will depend on the span length, roof load, need to lap, and budget.
What Is a Purlin?
A horizontal beam which supports the roof rafters, or the girts of a wall. It can be used for the transfer of loads from the roof sheeting like corrugated metal or trapezoidal metal to the main frame. Purlins used in industrial sheds, warehouses and cold storage buildings are typically cold-formed from galvanized (GI) steel, which is efficient, sections are consistent, and the coating helps protect against corrosion.
Purlins may look like simple steel strips, but they play a critical role in the building’s stability. Their ability to resist wind uplift, snow load and maintenance personnel weight bending. Selecting the wrong section can result in over-deflection, sheeting damage and/or even structural failure in extreme cases. Which is why it is important to know the difference between the two most popular shapes, C and Z before ordering.
What Is a C Purlin?
A C purlin has a C-shaped cross-section made up of a web and two flanges that turn in the same direction. It is one of the most widely used purlin types in India and across the world, and its popularity comes from a few practical advantages:
- It is simple to manufacture, so the cost per meter is generally lower.
- It is easy to bolt or weld to rafters, frames, and cleats.
- It works well for shorter spans and smaller structures such as sheds and workshops.
- It is available in a wide range of depths and thicknesses, so it can be matched to many load conditions.
The main limitation of a C purlin is that it cannot be lapped over its supports. Each purlin sits as an individual member between two rafters, so the span is largely fixed by the rafter spacing. For buildings with wide bays or heavy roof loads, this can mean more supports and more steel, which affects the total project cost.
What Is a Z Purlin?
A Z purlin has a Z-shaped section, with flanges that bend in opposite directions. This geometry allows one purlin to overlap the next at the support, creating a continuous beam effect across several bays. The main benefits include:
- Lapped joints add stiffness and reduce deflection across the roof line.
- Longer spans can be achieved with less material compared to a simple, unlapped system.
- Loads are shared more effectively along the purlin line, which improves overall performance.
- The lapped section is typically bolted at the support, creating a secure and rigid connection.
Z purlins are common in large industrial buildings, factories, logistics warehouses, and long-span roofs where wind or snow loads are high. Because they can be lapped, they help engineers design structures with fewer intermediate supports and more open interior space.
C Purlin vs Z Purlin: Comparison Table
|
Factor |
C Purlin |
Z Purlin |
|
Cross-section |
C-shaped channel |
Z-shaped section |
|
Typical span |
Short to medium |
Medium to long |
|
Lapping at supports |
Not possible |
Possible, creates continuity |
|
Load capacity |
Good for light to moderate loads |
Higher for the same weight in lapped systems |
|
Installation |
Simple and quick |
Requires careful lapping and bolting |
|
Material cost |
Lower per meter |
Higher per meter, but may need fewer supports |
|
Stiffness |
Moderate |
Higher when lapped |
|
Common use |
Small sheds, light roofs, wall girts |
Warehouses, factories, long-span industrial roofs |
Key Differences Between C Purlin and Z Purlin
1. Shape and Structural Behavior
The C purlin is a single channel that carries load in a straightforward way. Its flanges turn in the same direction, which makes it simple to fix to the rafter but limits how it can overlap. The Z purlin’s offset flanges allow it to nest over the support, which improves stiffness along the roof line and helps the structure resist bending over longer distances.
2. Span and Continuity
C purlins are best suited to spans that do not require overlapping. Because each member sits independently, the design must rely on the strength of the single section between supports. Z purlins can be lapped, so the roof behaves more like a continuous beam. This reduces deflection and allows longer spans, which is valuable in large buildings where column-free interior space is a priority.
3. Load Capacity
For the same depth and gauge, a lapped Z purlin system generally carries more load than a simple C purlin system. However, actual capacity depends on section size, steel grade, thickness, coating, and support spacing. Load calculations should always be carried out by a structural engineer using the applicable design standard, rather than relying on general comparisons.
4. Cost and Material Use
C purlins usually cost less per meter and are faster to install on simple layouts. Z purlins cost more per meter, but on long spans they can reduce the number of supports, the amount of steel in the frame, and sometimes the overall foundation work. The total project cost may therefore be similar, or in some cases lower, when Z purlins are used correctly.
5. Installation and Handling
C purlins are lighter to handle and easier to fix, which suits smaller crews and tight schedules. Z purlins require accurate lapping, correct overlap length, and proper bolt placement to achieve their designed performance. Careless installation can reduce the benefit of the lapped system, so experienced fabricators and clear drawings are important.
Applications of C Purlins and Z Purlins
C purlins are commonly used in:
- Small industrial sheds and workshops
- Agricultural buildings and storage sheds
- Wall girts and light roof structures
- Projects with tight budgets and shorter spans
Z purlins are commonly used in:
- Large warehouses and factory buildings
- Cold storage and logistics facilities
- Long-span roofs exposed to heavy wind or snow loads
- Structures that need continuous roof behavior and fewer intermediate columns
How to Choose Between C Purlin and Z Purlin
Selecting the right purlin type is a decision that balances structural need, cost, and installation practicality. Consider these factors before finalizing your order:
- Span length: Short spans generally favor C purlins. Long spans generally favor Z purlins.
- Roof load: Heavy loads from wind, snow, solar panels, or equipment often favor lapped Z purlins.
- Building size: Large buildings with many bays may benefit from the continuity that Z purlins provide.
- Budget: C purlins lower the upfront material cost. Z purlins may lower the total structural cost on long spans.
- Installation time: C purlins are typically faster to install on simple layouts with regular rafter spacing.
- Engineering requirements: Always confirm the final choice against structural design calculations and local building codes.
A practical approach is to share your building dimensions, bay spacing, roof slope, sheeting type, and design loads with a structural engineer or a reputable manufacturer. They can compare both options and recommend the section that meets safety requirements at the lowest total cost.
Frequently Asked Questions
1. What is the main difference between a C purlin and a Z purlin?
A C purlin is channel-shaped and cannot be lapped at supports. A Z purlin is Z-shaped and can be lapped, which creates continuity and allows longer spans.
2. Which is stronger, C purlin or Z purlin?
For the same size and thickness, a lapped Z purlin system is generally stronger and stiffer over long spans. For short spans, a C purlin is usually sufficient.
3. Are Z purlins more expensive than C purlins?
Z purlins often cost slightly more per meter. However, they can reduce the number of supports and total steel on long spans, so the overall project cost may be similar.
4. Can C purlins and Z purlins be used together in the same building?
Yes, in some cases. For example, C purlins may be used for wall girts while Z purlins are used for roof purlins. The design must be checked by a structural engineer.
5. What material are C and Z purlins made from?
Most purlins are cold-formed from galvanized steel (GI) or structural steel, with thickness typically expressed in gauge or millimeters. The material grade and coating should match the building’s environment, including humidity, coastal exposure, and industrial pollution.
6. Which purlin is better for a warehouse roof?
Z purlins are usually preferred for warehouse roofs because they handle longer spans and provide better stiffness. C purlins can work for smaller or lighter warehouse structures.
7. How do I know what size purlin I need?
Purlin size depends on span, spacing, roof load, wind and snow conditions, and the type of roof sheeting. Share your building dimensions and load requirements with a structural engineer or manufacturer for an accurate recommendation.
8. Do C purlins require lapping?
No. C purlins are typically installed as single members between supports. Lapping is a feature of Z purlin systems.
Conclusion
C purlins and Z purlins both support roof and wall sheeting, but their shapes lead to different performance. C purlins are simple, economical, and ideal for shorter spans and lighter loads. Z purlins offer continuity, longer spans, and higher stiffness when lapped. The right choice depends on your building’s span, load, and budget, and the final decision should always be confirmed through proper structural design.